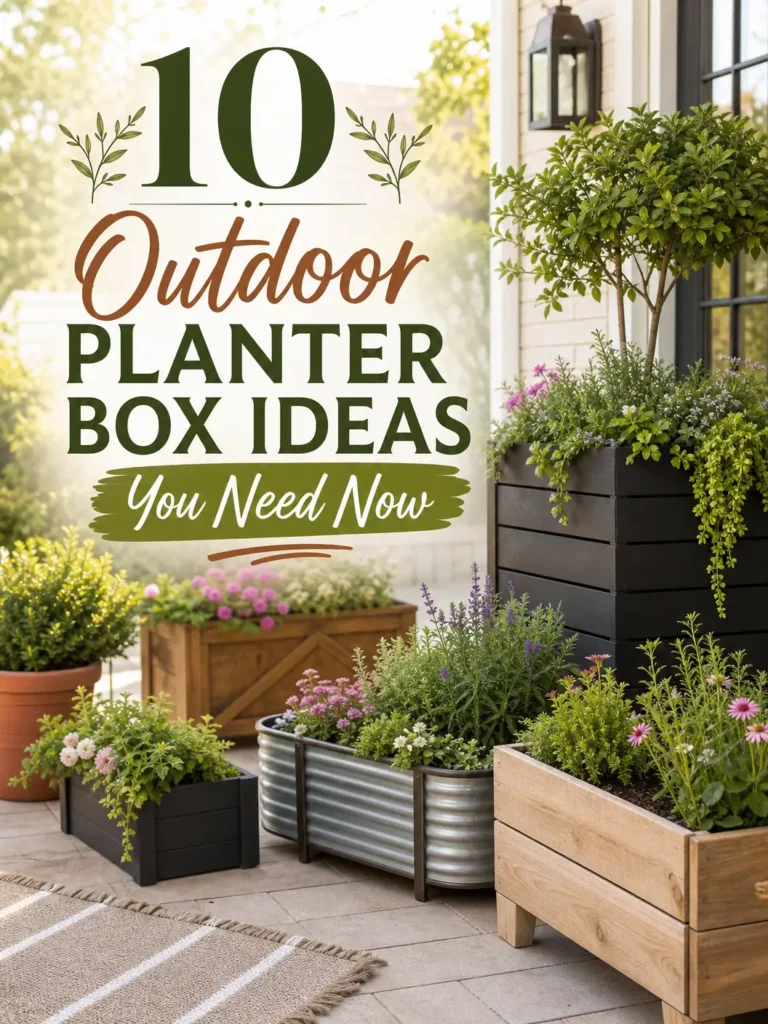
Honestly, when I first started dabbling in gardening, I thought outdoor planter box ideas were just, well, boxes for plants. Boy, was I wrong! What surprised me was how much of a game-changer they can be for transforming any outdoor space, big or small. From adding a pop of color to creating distinct zones, these versatile containers are a secret weapon for landscape designers.
In my experience, mastering the art of styling outdoor planter boxes can elevate your patio, deck, or garden from ordinary to extraordinary. You don’t need a massive budget or a green thumb the size of a tree trunk. With a few smart strategies, you can achieve that polished, professional look you’ve always admired. In this article, I’m going to share my top 10 pro tips, born from years of trial and error, to help you style your outdoor planter boxes like a seasoned landscape designer. Get ready to turn those drab corners into vibrant focal points!
Table of Contents
What Is Outdoor Planter Box Styling and Why It Matters
Here’s the thing: styling outdoor planter boxes isn’t just about throwing some dirt and a plant into a container. It’s about intentional design, creating visual interest, and enhancing the overall aesthetic of your outdoor living areas. Think of your planter boxes as mini-landscapes, each with the potential to tell a story or evoke a mood. When I first started, I’d just pick whatever looked pretty at the nursery. The result? A chaotic mess that never quite gelled.
Honestly, what I learned is that a well-styled planter box can define spaces, add privacy, introduce vertical elements, and even improve curb appeal. It’s about understanding scale, color palettes, plant textures, and how they all interact. It matters because your outdoor space is an extension of your home, and thoughtful design makes it more inviting, functional, and enjoyable. It’s the difference between a generic backyard and a personalized oasis.

Choosing the Right Planter Boxes: More Than Just a Pretty Face
When I first started, I made the classic mistake of buying the cheapest or prettiest planter boxes without considering their practical implications. Trust me, a beautiful box that doesn’t suit your plants or climate is a recipe for disappointment. The right planter box is the foundation of your design, impacting everything from plant health to aesthetic harmony.
Consider Material and Durability
I’ve tested everything from terracotta to plastic to wood. Terracotta looks classic but dries out quickly, requiring more frequent watering. Plastic is lightweight and affordable, but can look cheap and degrade in harsh sunlight. My personal favorite for durability and aesthetic appeal has become composite materials or treated wood. They offer a good balance of style, longevity, and plant-friendly environments. I once had a beautiful wooden planter rot out in two seasons because I didn’t realize it wasn’t properly treated for outdoor use. Lesson learned!
Size Matters: Go Bigger Than You Think
This is a mistake I see beginners make all the time, and honestly, I made it too. We tend to underestimate how much root space plants actually need. A small planter restricts root growth, leading to stunted plants and constant watering. When I started going for larger planters, my plants thrived, and I spent less time fussing over them. A good rule of thumb: choose a planter that’s at least 12-18 inches in diameter for most annuals and even larger for shrubs or small trees.
Drainage is Non-Negotiable
Here’s the thing about drainage: if your planter doesn’t have it, your plants will drown. It’s that simple. I once lost an entire collection of herbs because I used decorative planters without drainage holes. Now, I always check for adequate drainage holes, and if they’re not there, I drill them myself. You can also add a layer of gravel at the bottom, but the most important thing is that excess water has somewhere to go.
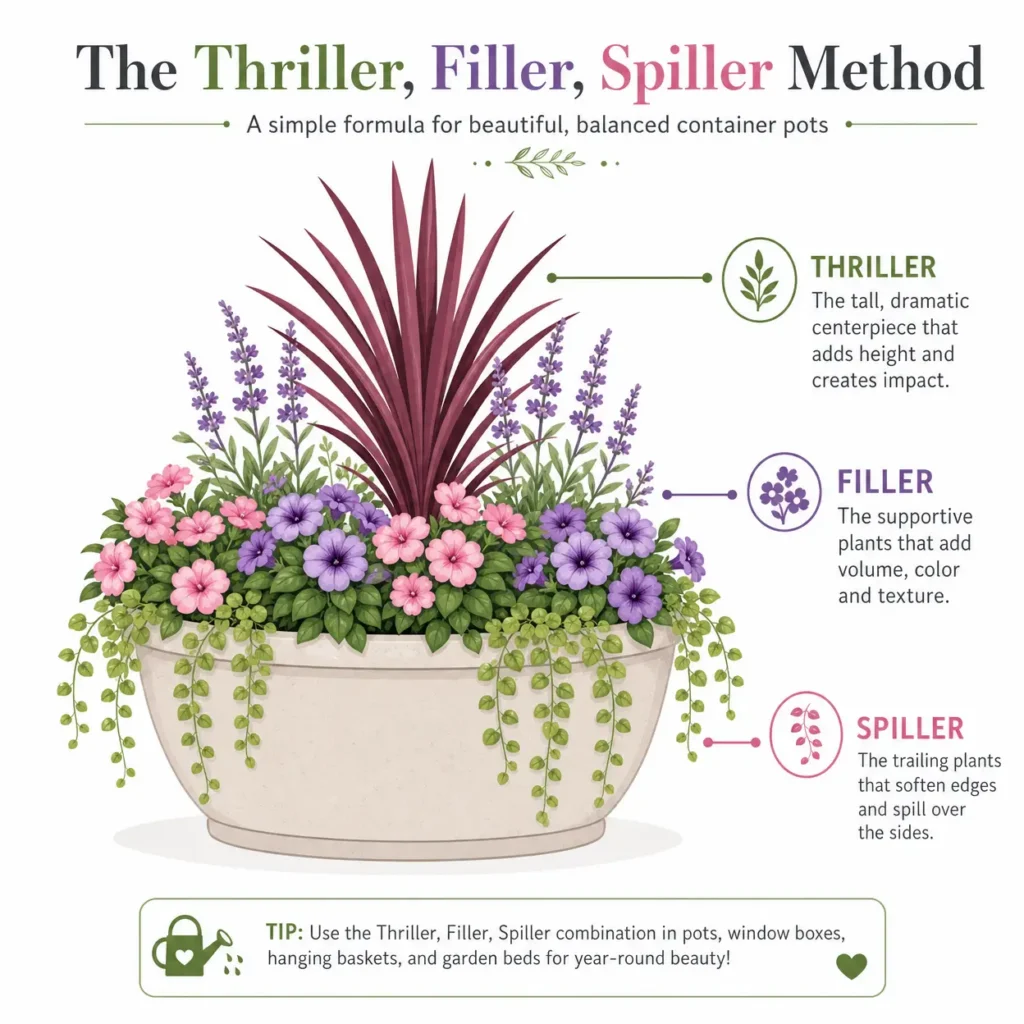
The Thriller, Filler, Spiller Method: My Go-To for Stunning Arrangements
After years of trial and error, trying to figure out why some planter boxes looked amazing and others just… didn’t, I stumbled upon the ‘Thriller, Filler, Spiller’ method. Honestly, this was a revelation for me. It’s a simple yet incredibly effective framework that landscape designers use, and once I started applying it, my planter boxes went from looking haphazard to truly professional. It’s all about balance and visual interest.
Thriller: The Star of the Show
Every great planter box needs a focal point, something that draws the eye. That’s your ‘thriller.’ It’s usually a tall, upright plant with dramatic foliage or vibrant flowers. In my early days, I’d often pick a beautiful plant, but it would get lost in the mix. The thriller needs to stand out. I remember one year, I used a stunning purple fountain grass as my thriller, and it instantly elevated the entire arrangement. It’s the vertical element that gives your planter height and drama.
Filler: The Body and Volume
Once you have your thriller, you need to fill in around it. These are your ‘filler’ plants. They’re typically medium-height, mounding plants that provide volume and color, bridging the gap between the thriller and the edge of the planter. Think petunias, impatiens, or coleus. I used to just cram in whatever fit, but now I carefully select fillers that complement the thriller in terms of color and texture. They create a lush, full look and prevent the arrangement from looking sparse. What surprised me was how much impact a good filler plant can have on the overall density and health of the planter.
Spiller: The Elegant Cascade
Finally, you need your ‘spillers.’ These are plants that trail over the edge of the planter, softening the hard lines of the container and adding a sense of abundance and grace. Think sweet potato vine, creeping jenny, or ivy. I once forgot the spillers, and my planter looked stiff and unfinished. Adding them made all the difference, creating a beautiful cascade that made the arrangement feel complete and natural. It’s like the finishing touch that ties everything together, making your planter look intentional and inviting.
Common Mistakes People Make (And How to Avoid Them)
Honestly, I’ve made almost every mistake in the book when it comes to outdoor planter boxes. Learning from them has been a huge part of my journey to styling them like a pro. Here are a few common pitfalls I’ve encountered, and how you can steer clear of them.
1. Underestimating Drainage Needs
I made this mistake too. Early on, I thought a few small holes were enough, or that a layer of rocks at the bottom would magically solve everything. What I learned is that proper drainage is paramount. Without it, roots sit in soggy soil, leading to rot and plant death. Always ensure your planter has ample drainage holes, and if not, drill more. Elevating the planter slightly with pot feet can also help prevent water from pooling underneath.
2. Ignoring Sun Exposure
Here’s the thing: not all plants love the same amount of sun. I once bought a beautiful shade-loving fern and put it in a full-sun planter, wondering why it looked so sad and crispy after a week. It goes without saying, but matching your plants to the light conditions of your planter’s location is crucial. Observe your space throughout the day to understand its sun patterns before you even think about buying plants.
3. Overcrowding Your Planters
Honestly, it’s tempting to buy all the pretty plants and try to fit them into one planter. I did this countless times, and the result was always a struggle for resources, stunted growth, and an overall messy look. What surprised me was how much better a planter looks with fewer, healthier plants. Give your plants room to grow and breathe. Remember the thriller, filler, spiller method – it helps guide you on how many plants are truly needed for a balanced look.
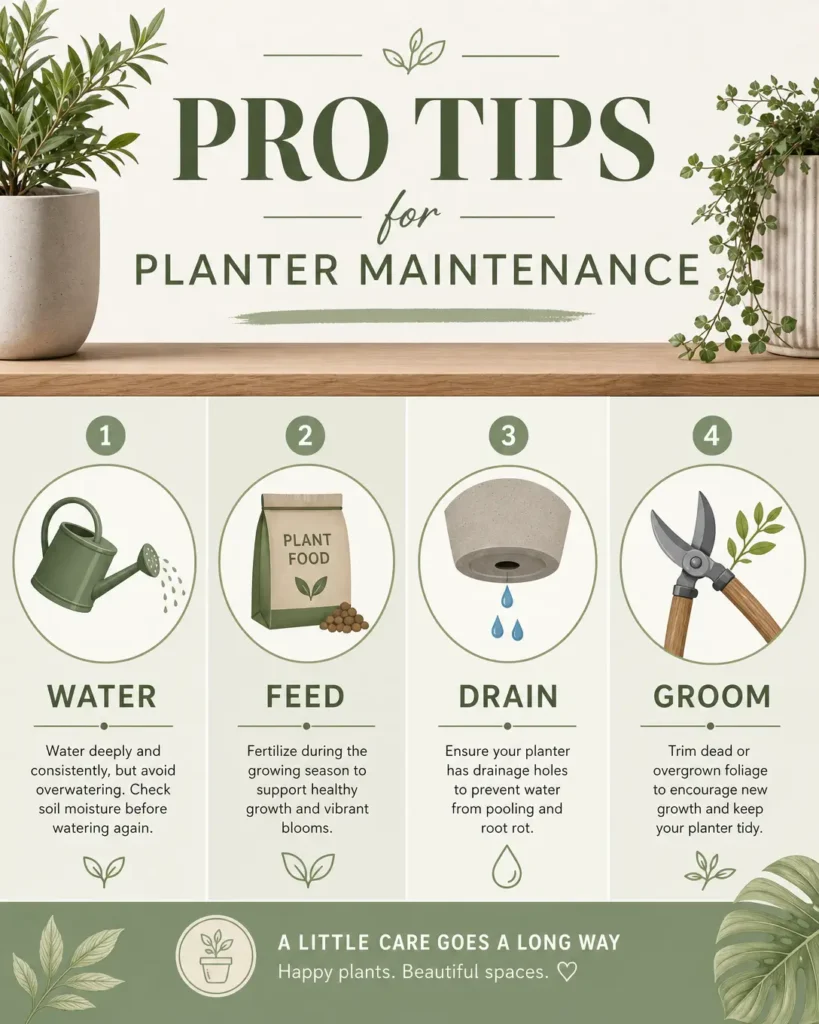
4. Neglecting Regular Maintenance
When I first tried gardening, I thought once the planter was set, my job was done. Nope! Planter boxes, especially, need consistent attention. They dry out faster than in-ground gardens, and plants in confined spaces use up nutrients more quickly. Regular watering, fertilizing, and deadheading (removing spent blooms) are essential. I’ve seen beautiful arrangements decline rapidly just from a lack of consistent care. It’s a commitment, but a rewarding one.
Practical Tips to Get Better Results
After years of experimenting with outdoor planter boxes, I’ve gathered a few practical tips that have consistently helped me achieve stunning results. These are the little tricks that can make a big difference.
1. Elevate Your Planters for Impact and Drainage
What surprised me was how much elevating a planter, even just a few inches, can transform its appearance. It adds visual height, makes the arrangement more prominent, and significantly improves drainage by allowing air to circulate underneath. I use simple pot feet or even decorative bricks to lift my planters, and the difference is always noticeable. Plus, it helps prevent staining on your patio or deck.
2. Group Planters for a Cohesive Look
Here’s the thing: a single planter can look a bit lonely. In my experience, grouping planters of varying heights, sizes, and even materials creates a much more dynamic and cohesive display. Think in odd numbers – three or five planters grouped together often looks more natural and aesthetically pleasing. It creates a focal point that draws the eye and adds depth to your outdoor space.
3. Don’t Forget the Foliage First
Honestly, when I first started, I was always drawn to the flowers. But what I learned is that foliage plants provide structure, texture, and color for the entire season, long after blooms have faded. Prioritize interesting foliage – think variegated leaves, deep purples, or silvery greens – and then add flowers for pops of seasonal color. This approach ensures your planter boxes look fantastic even when nothing is in bloom.
4. Consider Seasonal Swaps for Year-Round Interest
What surprised me was how easy it is to keep planter boxes looking fresh year-round with seasonal swaps. In spring, I might have tulips and pansies. For summer, vibrant annuals. In fall, mums and ornamental grasses. And even in winter, evergreen boughs, small conifers, or decorative branches can provide structure and beauty. It’s a simple way to ensure your outdoor space always feels alive and inviting.
5. Incorporate Lighting for Evening Ambiance
In my experience, adding subtle lighting to or around your planter boxes can dramatically enhance your outdoor ambiance after dark. Small solar-powered spotlights can highlight your thriller plants, or string lights woven through trailing spillers can create a magical glow. It extends the enjoyment of your beautifully styled planters well into the evening, making your outdoor space truly come alive.
So there you have it – my top 10 pro tips for styling outdoor planter boxes like a landscape designer. It’s been a journey of learning, a few plant casualties, and a lot of rewarding moments watching my outdoor spaces transform. Remember, gardening is all about experimentation and finding what works for you and your unique environment. Don’t be afraid to try new things, mix and match, and most importantly, have fun with it!
If you try any of these tips or have your own favorite planter box styling secrets, I’d love to hear about them. Happy planting!